Geometry Dash Demon Level List for Beginners (2026 Guide)
Do not know which Geometry Dash Demon to beat first? This beginner guide gives you a clear Classic and Platformer progression path, with level IDs, practice advice, and the best…
Beating your first Demon in Geometry Dash is a major milestone. It is the point where the game stops feeling like random survival and starts feeling like something you can actually master. The problem is that the in-game Demon pool is so huge that most new players have no clue where to begin.
The biggest mistake beginners make is jumping too far, too early. Do not be the player who clears The Nightmare and immediately decides Bloodbath is next. That is not progression. That is self-harm with extra clicks. You need a ladder.
Here is the ladder beginners should actually climb.
Path A: The Classic Route (Mastering Rhythm, Wave, and Consistency)
If you want to master traditional Geometry Dash, this is still the most reliable route. It teaches the real fundamentals in the right order: reading, timing, ship control, wave control, then long-run consistency.
Level 0: The Absolute Beginning
Do not start with Clubstep. Start with the old beginner Demons that have trained players for years. Their Demon rating is real, but their actual gameplay is much closer to tough non-Demon levels than to modern Easy Demons.
- The Nightmare by Jax (Easy Demon, ID: 13519): Still the classic first Demon. It gives you simple ship and cube gameplay with forgiving timings, so you get confidence without instant punishment.
- The Lightning Road by Timeless Real (Easy Demon, ID: 55520): Another old beginner staple. It relies more on memory and fake-path awareness than hard execution, which makes it useful even if it looks outdated.
Between the two, The Nightmare is usually the cleaner first clear. The Lightning Road is where beginners start learning that fake paths and memory can kill you even when the click timings themselves are easy.
Level 1: The Official Big Three
Once those first user Demons feel manageable, move into the built-in official Demons. These are important because they introduce the parts of Geometry Dash that keep mattering forever.
- Clubstep (official level): Your first real test of tighter ship control and light memory pressure.
- Theory of Everything 2 (official level): A stronger transition test with faster mode changes and more serious wave exposure.
- Deadlocked (official level): Still the hardest official level for most players, mainly because it pushes wave consistency much harder than the others.
A lot of players want to do these in order because they are official, and that is fine. Just know the real skill jump is not from The Nightmare to Clubstep. It is from TOE 2 into Deadlocked, where the game finally starts checking whether your wave is actually stable.
Level 2: Your first real community ladder
After the official levels, you are finally ready to build a proper progression route. This is where players usually split into skill lanes. Some go for modern visual levels. Some go for wave-heavy circles levels. Both can work, as long as the route is consistent.
- First Medium Demon: B by motleyorc (Medium Demon, ID: 34085027). This is still a strong modern beginner-medium because it introduces more serious decoration, pacing changes, and boss-fight pressure without becoming unreadable.
- Alternative First Medium Demon: Problematic (Medium Demon, ID: 6956640). Pick this if you want a more direct bridge into wave-heavy circles-style gameplay.
- First Hard Demon: Nine Circles (Hard Demon, ID: 4284013) or Jawbreaker (Hard Demon, ID: 7075386). These are still rite-of-passage levels because they force you to stop faking wave skill.
- First Insane Demon: Supersonic (Insane Demon, ID: 4706930) or Windy Landscape (Insane Demon, ID: 4957691). These are where consistency becomes the real exam.
If you are unsure between B and Problematic, the rule is simple: B is the better modern readability test, while Problematic is the better wave-leaning bridge into Hard Demons.
Level 3: Approaching your first Extreme
When you finally start looking at Extremes, avoid levels that are only technically "entry" Extremes because they are weird, inconsistent, or full of legacy nonsense. Your first Extreme should teach you what Extreme Demon gameplay actually feels like.
- Acu (Extreme Demon, ID: 61079355): One of the most common first Extreme choices because it teaches fast flow, rhythm stability, and muscle memory under pressure.
- Cataclysm (Extreme Demon, ID: 3979721): A more classic first Extreme route. The opening wave is infamous for a reason, and if you can stabilize it, the level teaches real old-school Extreme fundamentals.
If you want the cleaner modern route, choose Acu. If you want the more traditional milestone that people still respect instantly, choose Cataclysm.
Path B: The Platformer Route (The easier second path to serious progress)
Since 2.2, you do not have to rely only on Classic Mode. Platformer Demons offer a completely different style of progression: manual movement, checkpoints, more route control, and less pressure from auto-scroll.
If Platformer is your main interest, the key checkpoints are below — and the full guide is one click away.
- First Platformer Demon Moon: Idling Somewhere (Easy Demon, ID: 99170473)
- Best beginner-friendly showcase level: Forsaken City (Easy Demon, ID: 97906220)
- First real movement-tech teacher: SpeedTek (Hard Demon, ID: 97812307)
- First serious Platformer Extreme target later on: Storm Front (Extreme Demon, ID: 100486532) or Robot King (Extreme Demon, ID: 99927952)
That means you now have two valid beginner routes in 2026. Classic if you want rhythm and run consistency. Platformer if you want route control, checkpoint learning, and movement-specific progression.
How to actually practice these levels
Knowing the levels is only half the battle. If you just throw yourself at Normal Mode from 0% over and over, you will burn out and learn slowly. Here is the version of practice that actually works.
- First Practice run: place a checkpoint every 5 to 10 seconds no matter what. Do not worry about skill yet. Your only goal is to see the entire level layout once.
- Second Practice run: remove some checkpoints and start grouping sections together. This is where you stop sightseeing and begin learning transitions.
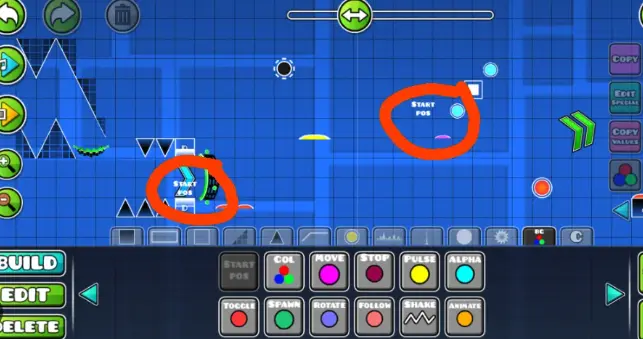
- Start Position strategy: identify the section where your death rate is clearly above 50%, place a Start Position there, and clear it 15 times before returning to full runs.
- Study one completion at 0.5x speed: do not watch it for hype. Watch it for click timing. Focus especially on wave spam, orb chains, and awkward ship corrections.
- Do not overpractice only the opening: once the first 30% feels stable, move your practice to the back half. A lot of beginner clears fail because the ending is still unfamiliar.