Drive Mad Level 139 Walkthrough - Runway Guide
Complete Drive Mad level 139 walkthrough. Learn how to beat Runway by building maximum launch speed, controlling lift in the air, gliding over the gap, and landing smoothly at t…
Drive Mad Level 139, called Runway, is an easy level built around takeoff speed, lift, and glide control. As part of the full Drive Mad levels progression, this stage asks you to use the runway to build enough momentum, fly over the gap, and land safely at the finish. If you are looking for a clear Drive Mad level walkthrough, this guide explains how to maximize launch speed, control the nose angle in the air, and land without crashing.
Why Level 139 Feels Hard
This Drive Mad level looks simple, but many failures come from poor flight control. If you leave the runway too slowly, the truck drops into the gap. If you lift the nose too much, the vehicle stalls and loses forward speed. If you over-correct in midair, the landing becomes unstable. The level is really about momentum, angle control, and balance.
Step-by-Step Walkthrough for Drive Mad Level 139
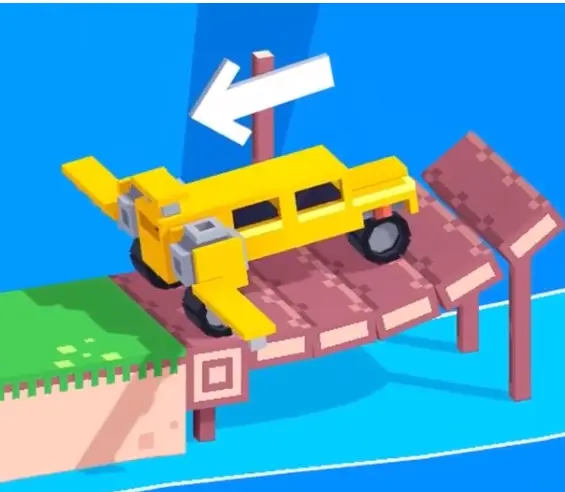
Step 1: Reverse to the far left and build maximum launch speed
Before starting the jump, back up all the way to the left side of the runway. In this Drive Mad level, that extra distance gives you enough space to reach top speed before takeoff. Once you are fully reset, accelerate hard and keep building speed toward the edge.
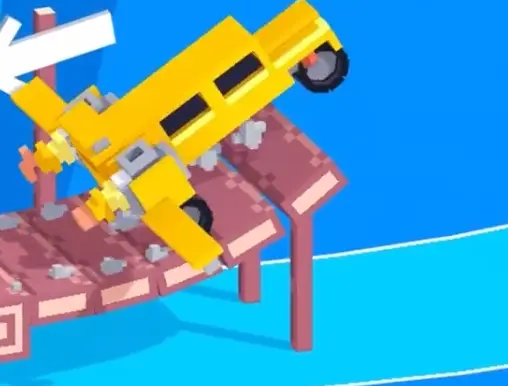
Step 2: Lift the nose slightly as you leave the runway
As the vehicle leaves the ground, tap backward briefly to raise the nose a little. This helps generate a cleaner glide path in this Drive Mad level. Do not overdo it. If the nose angle rises too much, the truck loses speed and stalls instead of flying forward.
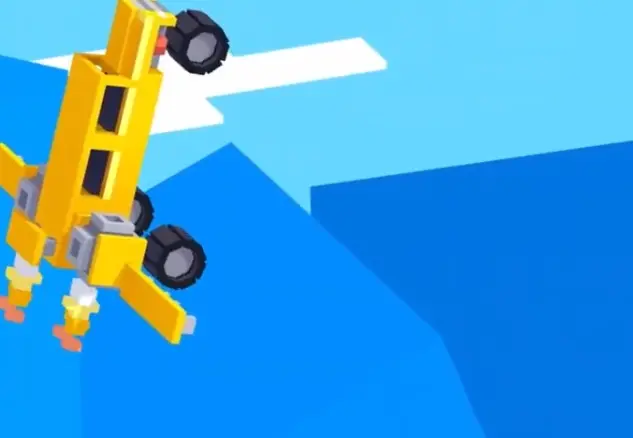
Step 3: Use small inputs in the air to keep the body level
Once airborne, alternate light forward and backward taps to keep the vehicle close to horizontal. The goal in this Drive Mad level is not to spin, but to glide. Try to hold a flat body angle so the wings keep providing lift while the truck moves across the gap.
The white arrow in the level is effectively a hint about lift direction. Trust your momentum and avoid excessive corrections.
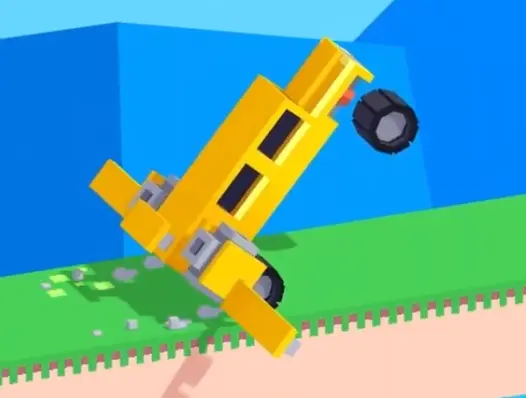
Step 4: Lower the nose slightly, then flare before touchdown
As you approach the landing area, lower the nose a little to increase descent speed, then raise it slightly again just before touching down. This final flare prevents a hard crash and helps you land smoothly enough to roll into the finish.
Best Cue for Consistent Clears
Do not over-control the flight. Most of the distance comes from launch speed and momentum, not constant steering in the air.
Why This Method Works
This method works because this Drive Mad level is built around runway acceleration and stable glide physics. Reversing first gives you the longest possible takeoff distance, which creates the momentum needed to cross the gap. A slight nose-up input converts that speed into lift, and small midair corrections keep the truck level instead of stalling or diving. The final landing flare reduces impact and preserves control.
Common Mistakes in Drive Mad Level 139
- Starting the run without reversing to the far left
- Leaving the runway without enough speed
- Pulling the nose too high and stalling
- Over-correcting in midair and losing balance
- Failing to flare before touchdown and crashing on landing
Fast Summary
- Reverse to the far left first
- Accelerate to maximum speed on the runway
- Lift the nose slightly at takeoff
- Keep the body level while gliding
- Flare gently and land at the finish
FAQ
How do you beat Drive Mad Level 139?
Reverse to the far left, build maximum speed, lift the nose slightly at takeoff, glide with small air corrections, and land smoothly at the finish.
Why is Drive Mad Level 139 difficult?
Because the level depends on momentum and flight angle. Too little speed drops you into the gap, while too much nose lift causes a stall.
What is the key trick in this Drive Mad level?
The key trick is using the full runway for speed and keeping your midair inputs small so the truck stays level and glides farther.
What does the white arrow mean in Runway?
It acts like a hint about lift direction and reminds you that stable glide control matters more than aggressive input.