How to Beat Theory of Everything 2 in Geometry Dash (2026 Updated)
Stuck on Theory of Everything 2? This Geometry Dash guide breaks down the first mini-Ship, UFO click patterns, Invisible Ball timing, fast Wave, infamous 79–82% mini-Ship, Secre…
Theory of Everything 2 is one of the most frustrating first-clear Demons in Geometry Dash because it keeps changing what it asks from you. One section is pure memory. The next is a speed test. Then the level suddenly throws you into a tighter Ship, a faster Wave, or a gravity change that punishes one nervous click.
If Clubstep teaches fake routes, TOE2 teaches controlled panic. Invisible gameplay, high-speed maneuvering, rapid gravity switching, and late-run nerves are the real challenge here. The level becomes much more manageable once you stop treating it like one giant reaction test and start isolating the sections that actually decide whether your run lives or dies.
TOE2 at a glance
- Unlock requirement: 20 Secret Coins
- Length: about 93 seconds
- Minimum jumps: about 93
- Normal reward: 14 stars and 500 mana orbs
- All 3 Secret Coins reward an extra cube and a color unlock
- Music: DJ-Nate - Theory of Everything 2
That last point matters more than it sounds. TOE2 is not a rhythm game in the strict sense, but the background music can still help you stabilize UFO and Wave timing. If your clicks always feel late when you try to react visually, start counting the section with the song instead of only watching your icon.
Why Theory of Everything 2 feels so hard
TOE2 is difficult because it stacks different kinds of pressure in the same run. It uses invisible blocks and spikes, so you cannot rely on sight-reading alone. It has several 2x speed sections where Ship and Wave control demand tighter micro-inputs. And it keeps flipping gravity in places where one early click or one nervous hold can instantly end the attempt.
That is why this level creates so many late chokes. Even when you understand the layout, the final third still asks you to stay precise while your nerves get worse. The difficulty is not only the mechanics. It is the combination of mechanics plus pressure. For many first clears, something like 500 to 2000 attempts is completely normal, and it can go well beyond that if the late flight sections become your main mental wall.
Best practice setup before trying full runs
If you want your first clear faster, do not just grind from 0%. TOE2 is much easier when you isolate the death zones and practice them like separate problems. A full run is expensive, so your practice should focus on the parts that actually kill your attempts.
- Use Practice Mode early so the invisible sections stop feeling random.
- Turn on Show Hitboxes while learning hidden blocks, fake-looking safe spaces, and awkward gravity transitions.
- If the Wave or Ship timing feels unreadable, learn the rhythm slowly first, then return to normal speed once the motion makes sense.
- Use a copyable version with Start Positions so you can practice 11–16%, 39–43%, 65–71%, 79–82%, and 95% directly.
- On PC, many players find mouse inputs easier to keep consistent than keyboard in fast Ship and Wave sections.
How to use Start Positions for TOE2
- Search the in-game online browser for a copyable version of Theory of Everything 2.
- Place one Start Position around 79% for the infamous mini-Ship, and another around 65% if the fast Wave is your real problem.
- If the early invisible mini-Ship is still killing you, put a Start Position around 11% and learn that route separately too.
- Practice the final Orb trap by itself, because dying at 95% is usually a timing problem, not a route problem.
TOE2 walkthrough by section and percentage
0–11%: opening Cube, fake-orb possibility, and early gravity setup
The first few seconds are not the hardest part of TOE2, but they matter because the level is already teaching you its language: speed changes, gravity tricks, and the idea that obvious lines are not always the safe ones. There is also a well-known early fake-orb interaction that can be survived with correct timing, which is a good reminder that this level is comfortable with deceptive setups from the start.
Stay calm here and keep your rhythm clean so you reach the first real wall in control.
11–16%: first mini-Ship and the invisible block maze
This is the first section that makes many new players hate TOE2. The speed suddenly jumps to 2x, the corridor is filled with invisible blocks and hidden saws, and blind flying almost never works. The safest way through is to follow the small background arrows instead of guessing a route from memory alone.
Keep your mini-Ship lined up with the height of those background arrows. Do not fly too high or too low trying to over-correct. Once you treat the arrows like your actual flight guide, this section becomes much more readable than it first appears.
16–19%: first UFO, a rhythm trap not a sight-reading test
The first UFO section punishes players who try to react to visual height in real time. It is much more stable when you learn it as a click pattern. A practical way to think about this section is as a counted sequence: one click to clear the bottom threat on entry, then a short burst after the yellow portal, then a smaller reset after the blue portal before you settle for the landing.
The main mistake here is hesitating after the gravity portals. If you wait for visual confirmation every jump, you will usually hit a spike because the section moves too quickly for reactive play. A practical trick is to count the entry as a short beat pattern with the music: first click on entry, quick burst after the next strong beat, then reset again after the following portal instead of staring only at the UFO height.
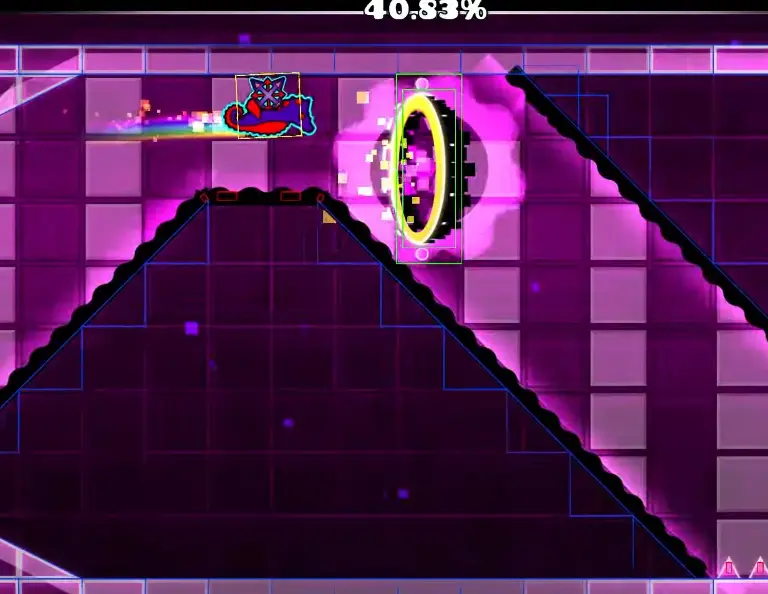
19–24%: early Ball section and gravity discipline
The early Ball section is not the biggest wall in the level, but it punishes lazy timing. The safest approach is to treat each gravity switch as deliberate. Do not mash because you feel behind. If you rush the flips, the section starts feeling random when it is really just punishing early clicks.
24–28%: second UFO and another rhythm check
This UFO is another example of why TOE2 is not a pure reaction level. It rewards pattern memory much more than visual improvisation. If your first UFO is stable but this one keeps collapsing, the problem is usually that you never turned the second sequence into a real click pattern.
This section also becomes easier when you tie the pattern to the music beat instead of trying to watch every single height change in real time.
28–39%: Cube and Ball cleanup before the memory wall
This stretch is easier than the sections around it, but it is not throwaway gameplay. The transitions still punish sloppy gravity timing, and this is exactly where newer players can lose rhythm before the Invisible Ball. Do not rush it. Clean entry matters more than bravado here.
39–43%: Invisible Ball memory section
This section is much more about memory than micro-control. The safest rule is late timing. Do not flip the Ball the instant it touches a platform. Let it roll almost all the way to the edge of the current invisible platform, then switch gravity. That late edge timing is more reliable than trying to pre-click the movement.
What makes this section annoying is the fake sense of safety. Some surfaces look trustworthy but are not. If you keep dying here, stop trying to read it live. Memorize the route and commit to that last-moment gravity timing instead.
43–65%: transitions, memory cleanup, and maintaining control
This middle stretch is not filler. It chains together Cube, Ball, portal sequencing, and gravity resets that are easy to underestimate because the hardest walls come later. The danger here is not one famous choke point. The danger is arriving at the Wave and late Ship already shaken because your transitions were sloppy.
Play this section like a control check. Stay clean through each portal order, respect the gravity changes, and do not mash to save bad positions. A lot of first clears die later because this section quietly destroys rhythm before the real speed walls even begin.
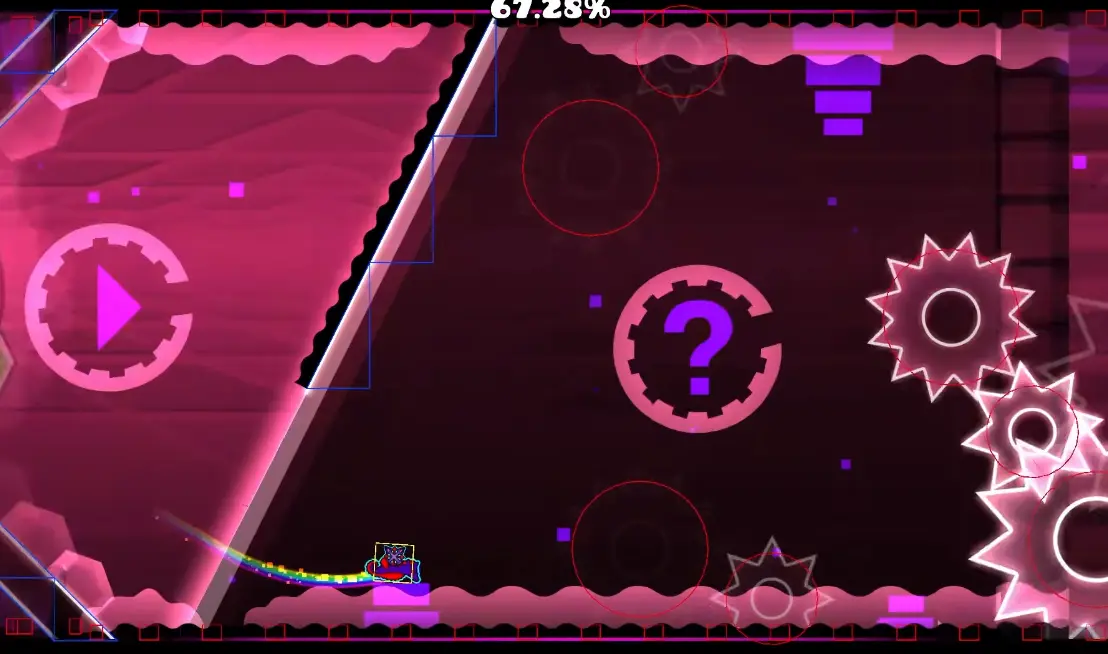
65–71%: Wave route, hidden coin path, and the first real speed wall
This is the first section where TOE2 really demands compact, fast micro-inputs. The safest way through is a tight double-click rhythm, not wide panic swings. Enter slightly upward so you do not clip the underside of the first spike, then keep the Wave centered instead of drifting too far above or below the middle line.
If you are dying here repeatedly, the problem is usually that your Wave is too wide. Keep the motion compact. This area also contains the second coin route, so make sure you know whether you are playing the normal line or the hidden path before the run gets there. Some players steady the opening by tying the first tight double-click to the first two strong music pulses instead of trying to invent the timing from pure panic.
71–79%: mini-Wave control, blue ring discipline, and calming down before the real wall
This is where some players lose the run by assuming the big danger is already behind them. It is not. The mini-Wave and surrounding transitions still need discipline. Enter the next portal from a controlled, slightly lower line if the transition keeps feeling awkward, because entering too high can make the section much less forgiving.
There is also a blue jump ring in this late stretch that newer players sometimes miss, which sends them into the ceiling and kills the run. Stay present. The actual first-clear wall is still ahead.
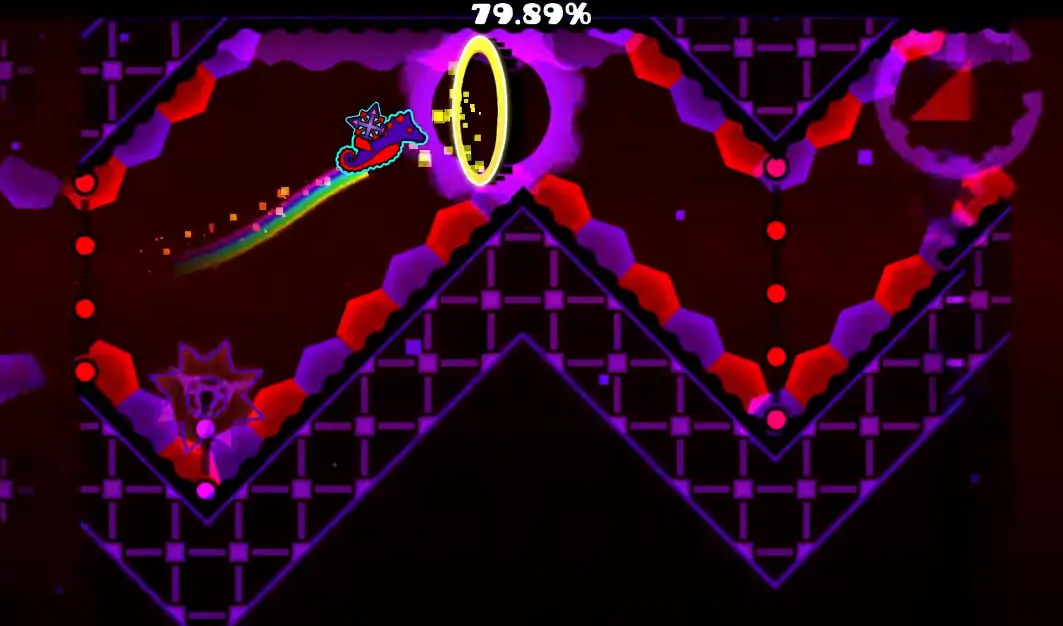
79–82%: The infamous mini-Ship, the real first-clear wall
This is the section that ruins most first clears. The mini-Ship is more sensitive than the normal Ship, the corridor is extremely tight, the visuals are distracting, and your nerves are already worse because you know you are deep into the run. If there is one section you should over-practice, it is this one.
As soon as you enter the gravity portal, release immediately and let the mini-Ship drop on its own for a moment. That natural drop helps you avoid the entrance spike. Once you are safely inside, stabilize with very short micro-clicks instead of bigger corrections. Big saves almost always turn into crashes here.
82–95%: do not let relief kill the run
This stretch is not just empty cleanup. It still includes late Cube control, jump-ring timing, a mini-UFO transition, and one more gravity change that can easily ruin a good run if you start relaxing too early.
Around 89%, there is a mini-UFO gravity portal that some players bypass with specific timing, but the stable route is still the better choice for a first clear. Treat this section as a control check, not as free percent.
95–100%: final Orb trap before the finish
This is a classic TOE2 timing trap. Do not buffer the final Orb. Wait until your icon fully reaches it, then click normally. If you press early, the Orb will launch you into the block above the finish and turn an almost-complete run into one of the most painful deaths in the level.
This death feels especially cruel because it happens after the hardest part is already behind you. That is why you should practice this Orb on its own. It is not hard because of complexity. It is hard because nerves make players input too early.
What percent is the hardest part of TOE2?
For most first clears, the hardest part of TOE2 is 79–82%, the mini-Ship section. The 65–71% fast Wave is the first real speed wall, but the mini-Ship is where precision, visual clutter, and nerves all combine into one section.
TOE2 Secret Coins: should you get them on your first clear?
Usually no. If your goal is your first TOE2 completion, the smartest play is to beat the normal route first and come back for the coins later. TOE2 already asks for enough memory and flight control. Adding coin routes on top of that creates more ways to waste a good run.
Coin 1 (around 13%)
Enter the yellow gravity portal in the early mini-Ship, then drop below the invisible block structure instead of staying on the normal line. Collect the coin underneath the hidden blocks, then rise back to the main route as the corridor opens. Do not stay low too long or you will miss the re-entry and crash.
Coin 2 (around 65%)
In the Wave section, stay on the normal route until the third diagonal corridor. At that point, enter the fake slope path instead of the visible safe line, grab the coin inside, then return to the main Wave route immediately so you still have enough room to stabilize before the next corridor.
Coin 3 (around 84%)
Late in Cube form, trigger the two jump rings, then take the ring marked by the X decoration and use a deliberately late next jump so you land on the coin route instead of the normal line. After collecting the coin, jump again from the edge of the last platform to return safely to the main route. This coin is much easier with a screenshot or practice checkpoint because the late timing matters more than raw speed.
How to practice the ending without wasting attempts
TOE2 is one of those levels where backward practice saves huge amounts of time. The ending is difficult enough that waiting through the whole level every time just teaches frustration.
- Start with 95% if the final Orb keeps killing good runs.
- Then isolate 79–82% until you can pass the mini-Ship calmly and repeatedly.
- After that, practice from around 65% so the Wave and mini-Ship become one connected late-game sequence.
- Only go back to repeated 0% attempts once the entire back half feels familiar instead of lucky.
This method is much more efficient than hoping one full run magically holds together. TOE2 rewards section mastery much more than brute-force grinding.
Advanced notes and optional skips
TOE2 has a few real advanced routes and hitbox quirks that experienced players sometimes use. These can be useful for route knowledge and community discussion, but they are not recommended for a first clear because they add more variables to an already nerve-heavy level.
- At the size-change portal around 70%, some players squeeze between the top of the portal and the ceiling instead of taking the normal route. This can skip the size change and simplify the immediate route, but it also makes the following mini-Cube section effectively impossible unless you already understand exactly what you are doing.
- Around 75%, some players survive awkward contact near the first yellow jump ring because of a hitbox quirk. Treat that as emergency luck, not a planned route.
- Stable routes are almost always better than clever bypasses when your goal is a first completion.
Common mistakes that keep players stuck on TOE2
- Ignoring the background arrows in the first mini-Ship and flying blind through the invisible maze
- Trying to react visually in the UFO sections instead of learning a click pattern
- Flipping the Invisible Ball too early instead of waiting for late edge timing
- Making the fast Wave too wide instead of using a compact double-click rhythm
- Holding too long when entering the 79–82% mini-Ship instead of dropping first
- Buffering the final Orb at 95% instead of waiting for normal timing
Should you beat Clubstep before TOE2?
Usually yes, but not because Clubstep is strictly easier in every possible way. Clubstep is a good warm-up for TOE2 because it teaches memory discipline, fake-route patience, and the ability to stay stable deep into a Demon run. TOE2 then adds faster transitions, more invisible gameplay, and a nastier late-run flight wall.
If you already have solid progress on TOE2, you do not need to abandon it. But if the level still feels unreadable from top to bottom, Clubstep is usually the cleaner first step.
FAQ
How do you unlock Theory of Everything 2?
You unlock TOE2 by collecting 20 Secret Coins in Geometry Dash's official level progression.
What percent is the hardest part of Theory of Everything 2?
For most players, the hardest part is 79–82%, the mini-Ship section. The fast Wave at 65–71% is also a major wall, but the mini-Ship is where first clears usually die.
Why do so many players die at 95% in TOE2?
Because the final Orb is a timing trap. Many players press too early out of nerves and get launched into the block above the finish instead of taking the clean route.
How many attempts does TOE2 usually take?
For many first clears, TOE2 takes roughly 500–2000 attempts, and it can go higher if late Ship and Wave nerves become the main problem.
Can you beat TOE2 on mobile?
Yes. TOE2 is fully beatable on mobile, but the fast Wave and mini-Ship usually feel less forgiving there than on PC. The solution is still the same: fixed rhythms, not panic corrections.
Should I use a copyable version and Start Positions for TOE2?
Yes. TOE2 becomes much more manageable when you isolate 11–16%, 39–43%, 65–71%, 79–82%, and 95% directly instead of replaying the whole level just to touch those sections once.
Next step
TOE2 becomes much less overwhelming once you stop calling every death random. Follow the arrows in the first mini-Ship, memorize the UFO sections like click patterns, use late timing in the Invisible Ball, keep the fast Wave compact, drop cleanly into the 79–82% mini-Ship, and never rush the final Orb. Once the late flight sections feel routine, your first clear is much closer than it looks.