Drive Mad Level 125 Walkthrough - Jump Hoops Guide
Complete Drive Mad level 125 walkthrough. Learn how to beat Jump Hoops by building momentum through the curved ramp, controlling your launch angle, flying through three wooden h…
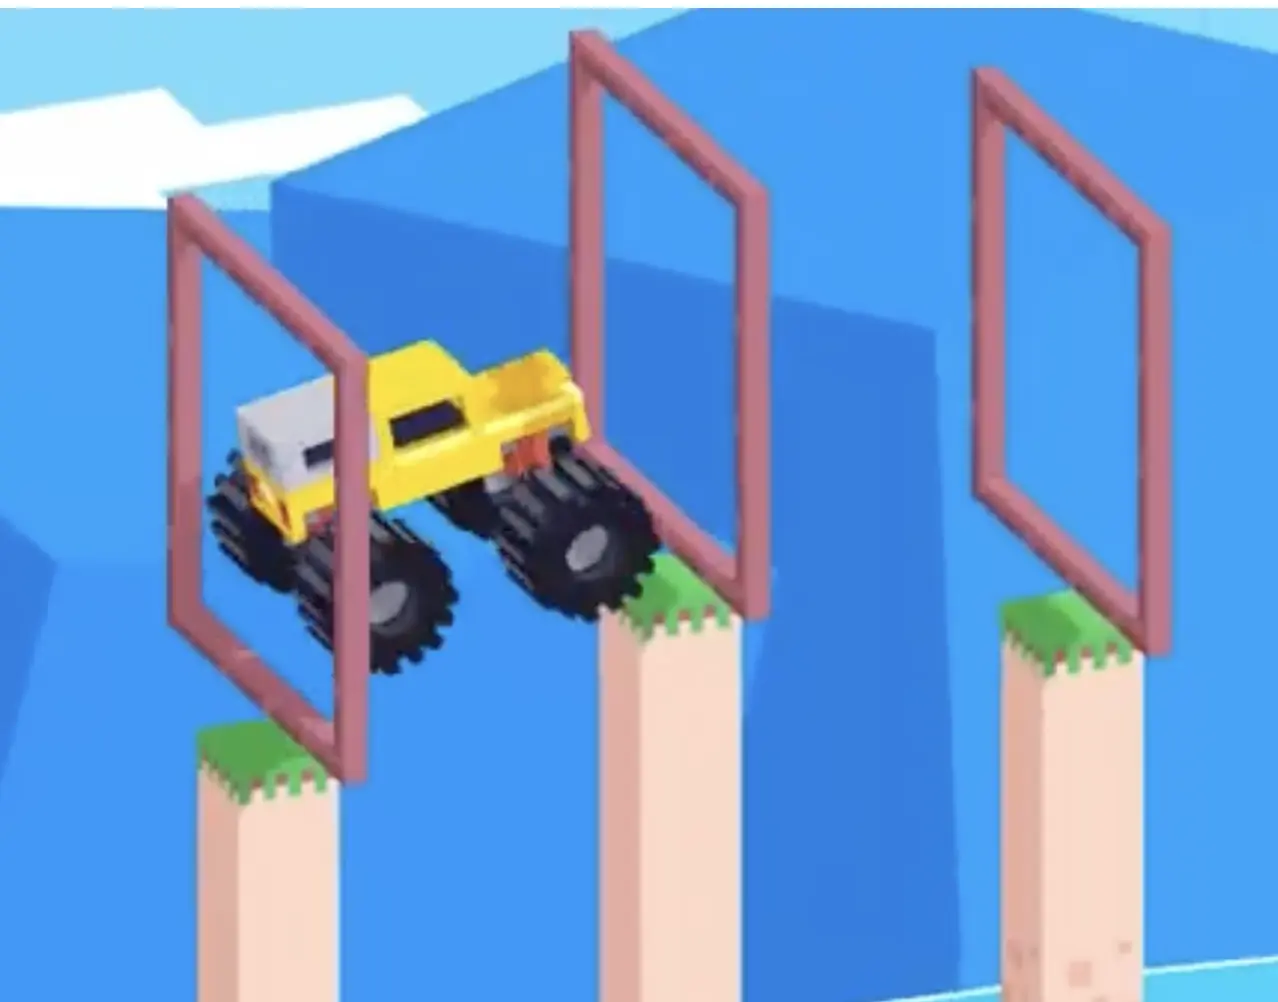
Drive Mad level 125, called Jump Hoops, is a medium-difficulty level built around timing and momentum. As part of the full Drive Mad levels progression, this stage asks you to use one clean launch to fly through three wooden hoop frames in a row before landing safely near the finish. The level is not about raw speed alone. You need the right entry pace on the curved ramp, the right launch angle at takeoff, and enough air control to keep the truck centered through all three hoops. If you are looking for a reliable Drive Mad level walkthrough, this guide explains how to build momentum at the bottom, control the long jump, and land without flipping.
Why Level 125 Feels Hard
This Drive Mad level feels hard because one mistake at takeoff usually ruins the entire attempt. If you enter too slowly, the truck will not clear the full sequence. If you launch too aggressively or with too much nose-up angle, the body drifts out of line and clips the hoops. Even after clearing the frames, the landing can still fail if you keep forcing the truck forward and let the suspension bounce into a flip.
Step-by-Step Walkthrough for Drive Mad Level 125
Step 1: Build momentum through the curved ramp and commit at the launch
As you roll down from the starting platform, keep a medium pace so the truck stays balanced on the curved section. Do not rush the descent too early, because a messy body angle here will carry into the launch.
Once you reach the bottom transition and the truck is lined up cleanly, commit to strong acceleration. This is where you store the momentum needed for the full three-hoop jump.

Step 2: Control the takeoff angle and stay centered through the three hoops
As the truck leaves the takeoff edge, pay close attention to the nose angle. If the front rises too much, the truck becomes unstable in the air and will drift out of the hoop line.
During the long jump, make only small corrections so the body stays near the center of each wooden frame. The goal is not dramatic rotation. It is to preserve a stable flight path all the way through the third hoop.
Step 3: Level out after the last hoop and let the suspension absorb the landing
After clearing the final hoop, bring the truck back to a flatter body position so it lands nearly parallel to the ground. This gives the suspension the best chance to absorb the impact without bouncing into a rollover.
As the wheels touch down, release unnecessary input and let the truck settle first. Once the body stabilizes, drive smoothly into the finish instead of forcing acceleration on the landing itself.

Best Cue for Consistent Clears
Think of the level as one long controlled flight, not three separate jumps.
Why This Method Works
This method works because the curved entry stores momentum, but the hoops punish unstable trajectory. A clean medium-speed descent keeps the truck balanced before takeoff. Strong acceleration at the bottom creates enough distance for the triple clear. Once airborne, small body corrections preserve the center line through the frames, and a flatter exit angle after the last hoop makes the suspension work for you instead of against you. The whole level is solved by protecting the jump shape from start to finish.
Common Mistakes in Drive Mad Level 125
- Entering the curved ramp too fast and ruining the launch angle
- Taking off with the nose too high
- Making oversized corrections in midair
- Dropping too low before the third hoop
- Holding forward during landing and flipping after touchdown
Fast Summary
- Use medium speed on the curved descent
- Accelerate hard through the launch
- Keep the truck centered through all three hoops
- Level the body after the last frame
- Land calmly and roll to the finish
FAQ
How do you beat Drive Mad Level 125?
Build momentum through the curved ramp, launch with a controlled body angle, stay centered through the three wooden hoops, then level out and land cleanly before driving to the finish.
Why is Drive Mad Level 125 difficult?
Because the whole level depends on one long jump. Bad launch angle, poor air control, or a rough landing can ruin the run even if your speed is close.
What is the key trick in Drive Mad Level 125?
The key trick is protecting your flight path. You need enough momentum to clear all three hoops, but you also need a stable nose angle so the truck stays centered in the air.
Should I keep holding forward when I land?
Usually no. Releasing extra input on touchdown helps the suspension absorb the impact. Holding full throttle during landing often causes an unstable bounce or flip.