Drive Mad Level 71 Walkthrough - Jump Machine Guide
Complete Drive Mad level 71 walkthrough. Learn how to beat Jump Machine by waiting for the moving launcher to rise just above platform height, hitting it during the safe timing…
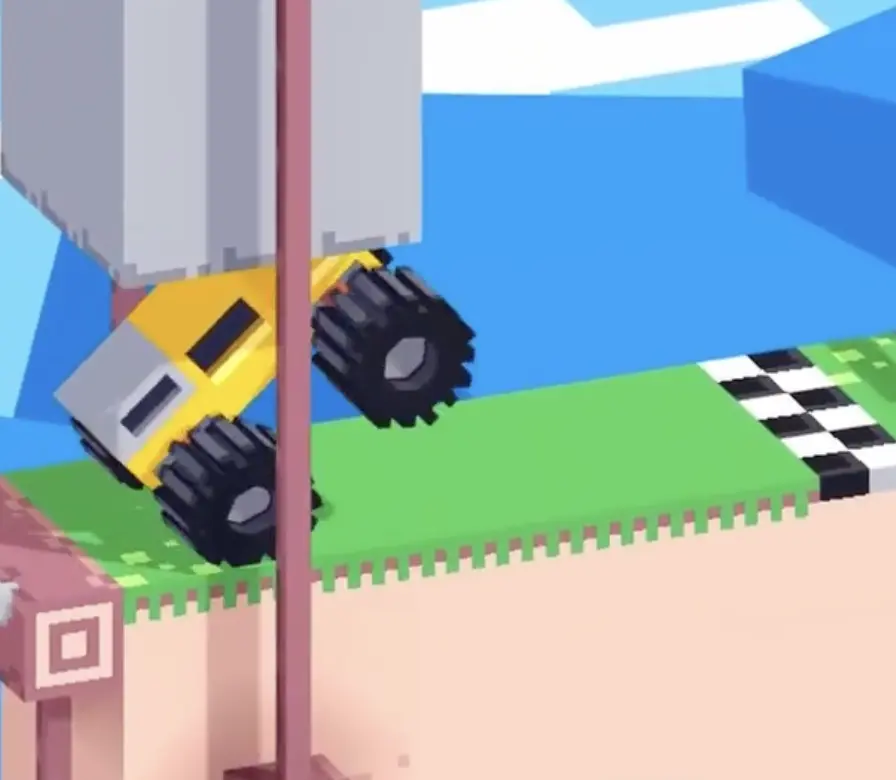
Drive Mad level 71, called Jump Machine, is a hard level built around timing and gap control. The central obstacle is a moving mechanical launcher that keeps rising and falling between your platform and the next section. The problem is that the landing zone is not open space. It feeds directly into a narrow low-clearance passage. That means your jump has to be synchronized very precisely. If you launch too high, the truck smashes into the ceiling area. If you launch too low, it drops into the gap. This level is all about hitting one safe window where height and distance line up perfectly.
Why Level 71 Feels Hard
This level feels difficult because it punishes both impatience and overconfidence. Many players rush straight into the launcher without reading its cycle, which usually sends the truck either too high into the ceiling or too low into the pit. The tunnel after the jump makes the timing even stricter, because you are not just trying to cross the gap. You are trying to enter a narrow channel at the correct height. It is a synchronization puzzle disguised as a jump.
Step-by-Step Walkthrough for Drive Mad Level 71
Step 1: Stop at the edge and study the jump machine's rhythm
Do not rush off the starting platform. Pause near the lip and watch the moving launcher go through at least one full up-and-down cycle. You are looking for the safe visual cue: the machine should be a little higher than the ledge where your truck is waiting. That height creates the best launch path. Too early and the truck gets dumped low. Too late and it gets thrown upward into the low ceiling section.

Step 2: Launch when the moving platform sits slightly above your ledge
Once the machine reaches that slightly elevated position, accelerate decisively and let it carry the truck across. You do not need wild speed here. What matters is matching your approach to the machine's height so the truck leaves at a smooth shallow angle. If your attempts keep crashing into the roof, trim your speed a little. If you keep dropping short, commit more firmly to the acceleration.
Step 3: Settle into the low-clearance passage and roll straight to the finish
If the timing is correct, the truck enters the narrow passage cleanly and drops into the landing area without getting crushed or wedged. From there, the hard part is over. Keep the truck steady and continue forward into the finish. You do not need another trick after the launch. The entire level is decided by whether you enter the tunnel at the right height.
Best Cue for Consistent Clears
Wait, sync, launch low.
Why This Method Works
This method works because the jump machine controls your launch angle more than raw throttle does. By waiting for the launcher to rise slightly above platform height, you create the exact compromise the level wants: enough lift to cross the gap, but not so much lift that the truck smashes into the top of the tunnel. The truck then enters the low-clearance area on a flatter path, which keeps the body from snagging on the ceiling or falling awkwardly into the gap below.
Common Mistakes in Drive Mad Level 71
- Rushing straight into the machine without first learning its up-and-down cycle
- Launching while the mechanism is too low and falling into the gap
- Launching too late when the mechanism is too high and hitting the tunnel ceiling
- Using maximum speed every time instead of adjusting speed to the jump height
- Panicking after the landing when the real challenge was already solved at takeoff
Fast Summary
- Stop and observe the jump machine first
- Look for the moment when it rises slightly above your ledge
- Accelerate cleanly during that safe timing window
- Enter the tunnel on a low controlled arc
- Drive forward to the finish once you land safely
FAQ
How do you beat Drive Mad Level 71?
Wait for the jump machine to rise slightly above the starting platform, launch during that timing window, and let the truck enter the low tunnel at a shallow angle before driving straight to the finish.
Why is Drive Mad Level 71 difficult?
Because the jump must satisfy two conditions at once. You need enough height to clear the gap, but not so much height that the truck crashes into the low-clearance ceiling.
What is the main trick in Drive Mad Level 71?
The main trick is synchronizing your launch with the moving platform's height. The safest moment is when the machine is just a little higher than your starting ledge.
What usually causes failure in Drive Mad Level 71?
Most failures happen when players mistime the launch and either fall below the tunnel entrance or get thrown too high into the ceiling area.
Should you go full speed in Jump Machine?
Not always. Timing matters more than brute speed. If you keep hitting the roof, reduce speed slightly. If you keep falling short, accelerate more decisively.